The standard steps for transferring a FluidFlow installation from one server to another are:
- Install FluidFlow on the new server.
- Copy FF3USERS.DB from the existing installation to the new installation.
- Copy the Preferences folder and all its sub-folders from the existing installation to the new installation.
- Copy the DATA folder and all its sub-folders from the existing installation to the new installation.
- Transfer the License from the existing installation to the new installation.
NOTE: Depending on the version of FluidFlow on the existing machine (and the version you intend to install on the new machine), the location of the files and folders on both, and the license transfer will differ.
Install FluidFlow on the new server
- We recommend downloading the latest version of FluidFlow from our website: http://portal.fluidflowinfo.com/portal/login.php (Please contact sales@fluidflowinfo.com, or your local distributor if you do not know your Username and Password for your account)
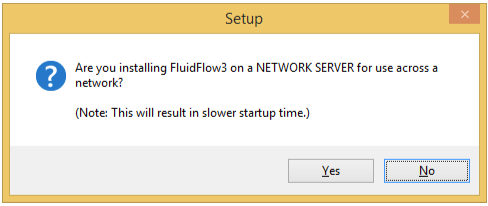
- When you run the FluidFlow installation program (FF3SETUP.EXE) select ‘Yes’ when prompted to:

- A PSFF.INI text file will be automatically created in the FluidFlow installation folder (by default, this is C:\Program Files (x86)\Flite\FluidFlow3) on your server. This file lets the application know the location of the DATA, Preferences, and License folders. For example:
[Options]
DataFolder=\\YourServer\C$\Users\Public\Documents\Flite\FluidFlow3\Data
PreferencesFolder=\\YourServer\C$\Users\Public\Documents\Flite\FluidFlow3\Preferences
NetworkAccessFolder=\\YourServer\C$\Users\Public\Documents\Flite\FluidFlow3
IMPORTANT: This is where an issue might arise as FluidFlow assumes the C drive will be shared when you do a network installation. We would recommend that you do not share the C drive itself, but share the “[Public Documents]\Flite\FluidFlow3” folder instead, and update the PSFF.INI accordingly.
Please see FluidFlow - Network Installation Instructions or contact support@fluidflowinfo.com for details if this is unclear.
- When you first run FluidFlow on the server, it will automatically be activated for 2 weeks, for a single user, with all modules. See the “Transfer” section below for moving your existing license.
Copy FF3USERS.DB to the new installation
This file stores the names and passwords of all FluidFlow users. The location of the file will vary depending on the version of FluidFlow on your existing installation, or if you are using a PSFF.INI:
- If a PSFF.INI has been created in the application folder, the NetworkAccessFolder entry should hold the location of the FF3USERS.DB file.
- If using FluidFlow v3.31 or lower, and there is no PSFF.INI | NetworkAccessFolder entry, the FF3USERS.DB file will be in the application folder (typically, C:\Program Files (x86)\Flite\FluidFlow3).
- If using FluidFlow v3.32 or higher, and there is no PSFF.INI | NetworkAccessFolder entry, the FF3USERS.DB file will be in the “Public Documents” folder (typically, C:\Users\Public\Documents\Flite\FluidFlow3). You can determine the “base” Public Documents folder by putting %PUBLIC% in the Windows Explorer address bar and searching from there.
When you find this file, copy it to your new installation to the location specified in the PSFF.INI’s NetworkAccessFolder entry.
Copy the Preferences Folder to the new installation
Each user has their own “Preferences” folder, which contains their individual calculation and flowsheet settings. The location of this folder will vary depending on the version of FluidFlow on your existing installation, or if you are using a PSFF.INI:
- If a PSFF.INI has been created in the application folder, the PreferencesFolder entry should hold the location of the “Preferences”.
- If using FluidFlow v3.31 or lower, and there is no PSFF.INI | PreferencesFolder entry, the folder will be under the application folder (typically, C:\Program Files (x86)\Flite\FluidFlow3\Preferences).
- If using FluidFlow v3.32 or higher, and there is no PSFF.INI | PreferencesFolder entry, the folder will be in the “Public Documents” folder (typically, C:\Users\Public\Documents\Flite\FluidFlow3\Preferences). You can determine the “base” Public Documents folder by putting %PUBLIC% in the Windows Explorer address bar and searching from there.
When you find this folder, copy it and *all* sub-folders to your new installation to the location specified in the PSFF.INI’s PreferencesFolder entry.
Copy the DATA Folder to the new installation
The location of this folder, which contains all the Equipment Data used by the application, will vary depending on the version of FluidFlow on your existing installation, or if you are using a PSFF.INI:
- If a PSFF.INI has been created in the application folder, the DataFolder entry should hold the location of the Equipment Data.If using FluidFlow v3.31 or lower, and there is no PSFF.INI | DataFolder entry, the folder will be under the application folder (typically, C:\Program Files (x86)\Flite\FluidFlow3\Data).
- If using FluidFlow v3.32 or higher, and there is no PSFF.INI | DataFolder entry, the folder will be in the “Public Documents” folder (typically, C:\Users\Public\Documents\Flite\FluidFlow3\Data). You can determine the “base” Public Documents folder by putting %PUBLIC% in the Windows Explorer address bar and searching from there.
When you find this folder, copy it and *all* sub-folders to your new installation to the location specified in the PSFF.INI’s DataFolder entry.
Transferring the License
The FluidFlow License Manager (FluidFlow3LM.EXE) is used to transfer your existing license to your new installation. Depending on the version of your existing installation, you may not have this application. It can be downloaded from: FluidFlow3LM.zip. Unzip this to the same folder as the FluidFlow application (PSFF.EXE) on your existing installation.
On the new installation:
- Start FluidFlow.
- Select the ‘Help | Activate FluidFlow…’ menu item.
- Make a note of the Product Id.
- Stop FluidFlow.
On the existing installation:
- Start FluidFlow License Manager.
- Select the “Export License” tab page.
- Enter the Product Id you made a note of from above.
- Enter a filename, e.g., C:\TEMP\Transfer.LIC.
- Select the modules that you want to transfer.
- Click the “Export License” button.
- Copy the Transfer.LIC file to your new server.
On the new installation:
- Start FluidFlow License Manager.
- Select the “Import License” tab page.
- Enter the filename, e.g., C:\TEMP\Transfer.LIC.
- Click the “Import License” button.
- Restart FluidFlow.